
Droste effect
Thread diagram as pair diagram
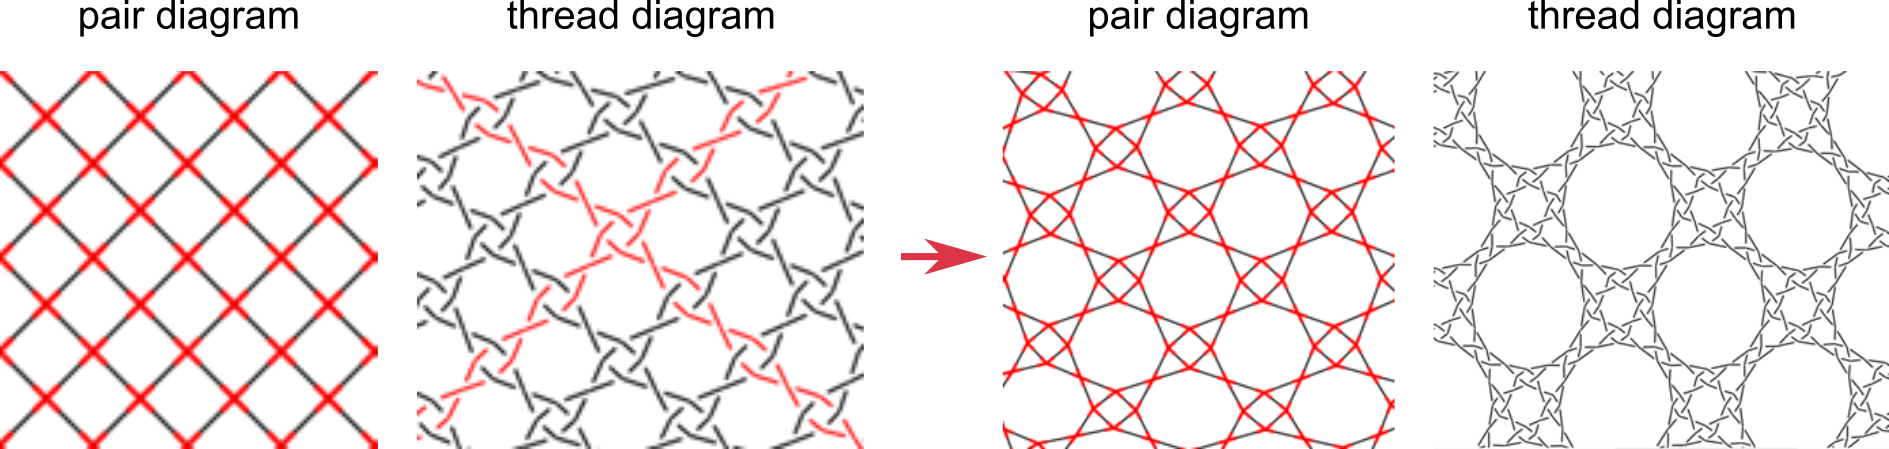
In a typical pair diagram, two pairs intersect at each crossing and then continue. In a thread diagram, two threads meet at each crossing and then continue. So why not take a thread diagram, flatten all the over/under information, and use it as a pair diagram? Using this technique, you can quickly create a new, usually more complex, pattern. This process can be repeated over and over again, as long as your computer has enough power to handle the increased complexity. In mathematics, this is called “recursion”. In art, it is sometimes called the “Droste effect”.
GroundForge uses its own color code shown on the second row of diagrams. This color-code accommodates unorthodox stitches.
The red arrow above represents a link to use the thread diagram as pair diagram.
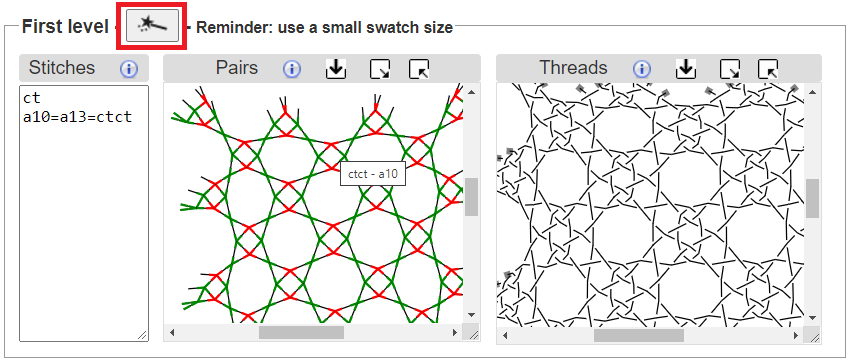
As generating diagrams may be time-consuming, you have to click a  to show the thread diagram.
Input boxes “stitches”
The input boxes called stitches have several options for specifying which stitches appear in the new thread diagram.
By default, every stitch is ctc. You can assign a new default stitch by typing the actions (such as ct) in the input box that appears to the left of the new pair diagram. You can also assign a stitch to every “cross” in the original thread diagram by typing cross=... (for example, cross=ctcll) in the input box. Similarly, you assign a stitch to every “twist” in the original thread diagram using twist=....
As the diagrams may be slow to render, changes in the input box cause grey backgrounds for the diagrams to indicate they are out of sync. Click the wands to update the diagrams. The wands are highlighted with red rectangles red in the screenshot below.
Clicking stitches in the pair diagram adds lines to the bottom of the stitches box,
typing these line manually is also possible.
The IDs on the left side of the added equations come from the right side of the tooltip in the pair diagram.

The actions on the right side of the equations come from the input box shown above.
You can type your own set of actions in this box or select a stitch from the gallery.
The color code in front of the input box changes along with the content of the input box.
The list of equations may grow long and contain duplicates. The last occurrence for an ID is the one that counts. The broomstick icon cleans up the list by removing duplicates and combine equations with the same set of instructions. For printing purposes, you can join lines separated with a comma.
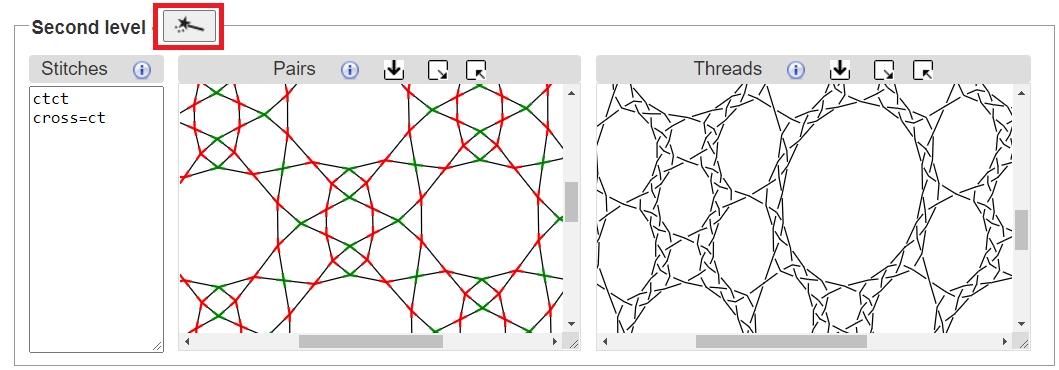
Repeat the process
To repeat this process a second time, click on the images for the second step. This will create another new thread diagram by using the thread diagram from the first level as a pair diagram.
You may want to get the first step out of the way by minimizing the panels for the diagrams.
Remember to refresh the thread diagram after refreshing the pair diagram, otherwise you still get outdated results.
Examples
Pair diagrams of several traditional grounds are very similar to thread diagrams of more basic grounds. The following tables show a few examples.
The first table uses a basic net with different stitches. The first column shows a thread diagram of the base pattern. The second column gives the stitches used in the Edit Pattern and First Level areas. The last column lists patterns in the Whiting gallery that either match exactly or have minor variations. Click on the stitch definitions in the second column to open the pattern in GroundForge.
| Base | Base → First Level | First level | Whiting gallery |
|---|---|---|---|
  |
ct → ctct |  |
A5, A6, B5, C6, A7-H7,G11 |
   |
ctct → ct/ctct |    |
A2, B2, B6, C6 |
 |
crclct → ct/ctct |   |
C6 |
 |
clcrclc → ctc and twists |  |
|
 |
ctctc → ctc and twists |  |
F2 |
In the following table, the “cloth motif” pattern is the base pattern.
| Base | Base → First Level | First level | Whiting gallery |
|---|---|---|---|
  |
ctct/ctcl → ctc/tt/tctct |  |
D16 |
 |
ct/ctct → ct/ctct | “tilted” rose ground |
Experiment
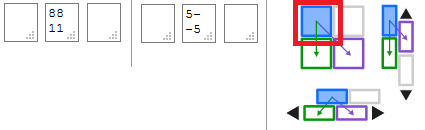
For the base pattern, start with something small. For example, enter an even number of alternating rows of 8’s and 1’s or -’s and 5’s in the Pattern definition page. Then click on the blue square of the simple layout (see below). Next follow the link to stitches and threads and finally follow the link to the Thread diagram as pair diagram page. Each page has a link back to the previous page and a button to show page specific help subjects.
Remember to keep the swatch size small. A large swatch size may be very slow.
Try a variety of stitches in the base pattern and the first and second level patterns. Try your own variations on the stitches show in the galleries.