Edit symmetries
The symmetry editor lets you design a pattern snippet alias template. With this template you can browse through numerous patterns assembled with flipped and/or shifted copies. This editor is inspired by Veronika Irvine’s course (first published in 2021) or rather the bonus lesson with Inkscape. Watching the YouTube course is a good start. This page simplifies tedious tasks and enforces some constraints.
Introduction
This symmetry page works differently from the other GroundForge tools. Other tools use links back and forth. The pages with diagrams can be saved as PDF’s without the forms, these documents link back to the interactive webpages to make further changes.
The symmetry page is based on downloading and uploading SVG files (vector images). These files follow conventions for ID’s and classes of objects that are vital for the web page. It is possible to customize the downloaded files with third party editors, but be aware that it is unlikely these tools preserve the conventions. So customized files may cause trouble when uploading them again. Working on a copy would be a wise precaution.
The page has a few forms before the editable template and (optionally) several swatches in a smaller scale. The swatches show various combinations of the template. One of the forms lets you browse through more swatches. You can drop, move and add stitches in the template and apply a color code to the stitches: the 4 colors per stitch approach.
Auxiliary pages
Auxiliary pages are emerging as proof of concepts for further development. These pages use uploads of files downloaded from the symmetry page. As of this writing (September 2025) we have:
- A new style of thread diagrams for the primary template.
- A page with correct tooltips for flipped versions of the template.
It needs more water under the bridge to create thread diagrams for the flipped templates too, let alone transform a full swatch into a thread diagram. Window dressing (like further downloads, integration and an option to apply forces to the thread diagrams) has to wait until the core functionality matures.
Download workaround: Right-click a desired diagram, select inspect.
A window will open with something like: <svg ...> ... </svg>.
Select it, right click, select copy, select outer HTML.
Paste in a text editor and save as an SVG file for further processing
or paste into another HTML page for publishing.
The forms
An overview of the fields and controls on the forms.
Export / Import
Other GroundForge pages use address bar components to define a pattern. With the symmetry editor you start with a new template, can save your work with a download and browse your saved files to reload.
Template
In this form you choose the dimensions for a new template and the type of corners.
The bottom line in the following image has some nodes moved upwards. It shows how the tile dimensions are expressed with number of stitches. Note that large dimensions can make the page slow and viewing all the patterns will require scrolling or zooming out (ctrl-minus on Windows, cmd-minus on Mac) by your browser.

You can get unexpected swatches when dimension values do not match the actual template. After changing width and or height you must create a new template or reset the values.
Modify template
These form fields influence the effect of click/tap actions:
- the number of twist marks on a line connecting two stitches
- delete a stitch or set its color code with the 4 colors per stich system
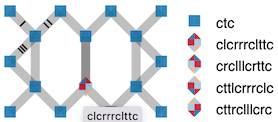
- the stitch definition that defines the color code: a sequence of the letters c(ross), t(wist), l(left twist) and r(ight twist)
Swatches of templates
The swatches are constructed by reflections, rotations and glides of template copies.
The form section has:
- a checkbox to dis/enable the swatches, their presence reduces performance of editing the template
- a field to define the amount of indenting rows/columns of template copies in the swatches
- two dropdowns and a text field to configure the swatches
- a button to take the value of the 4-letter dropdown to fill the text field
- a show button to update the swatches when editing the text field
- the scale button can show more swatches in a smaller space or give more space for the legend
The letters bdpq are used to illustrate the transformation per copied template.
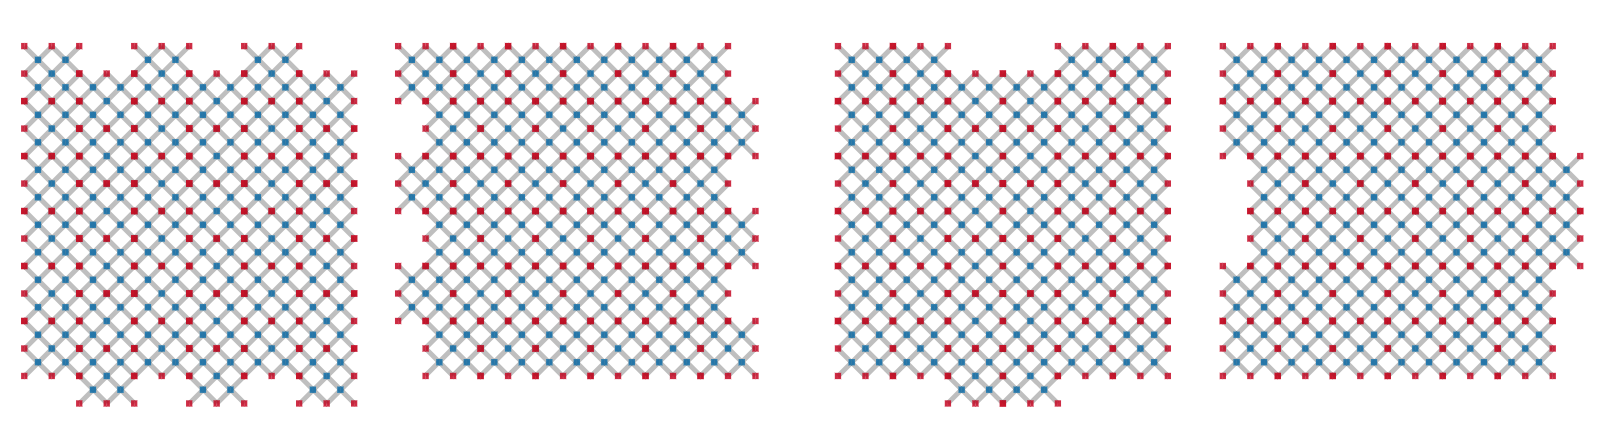
The first two rows of swatches have the four letters arranged in diagonals,
columns and rows as shown by bars in the following figure.
Marks at the start of the rows and columns indicate the indent pattern,
either one row/column at a time or two.
The text field can be complete custom or take the sequence of the second dropdown in the z-shape order. The text field should contain a 4x4 sequence even if that means repeating yourself. This last row of swatches is omitted on invalid input.

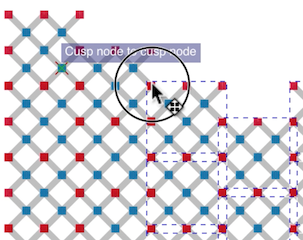
Some swatches repeat themselves faster than others. The maximum value of the indent field allows all swatches to browse through all options. When full repeats of the template are indented, templates are added up front and dropped from the back as shown in the following figure.
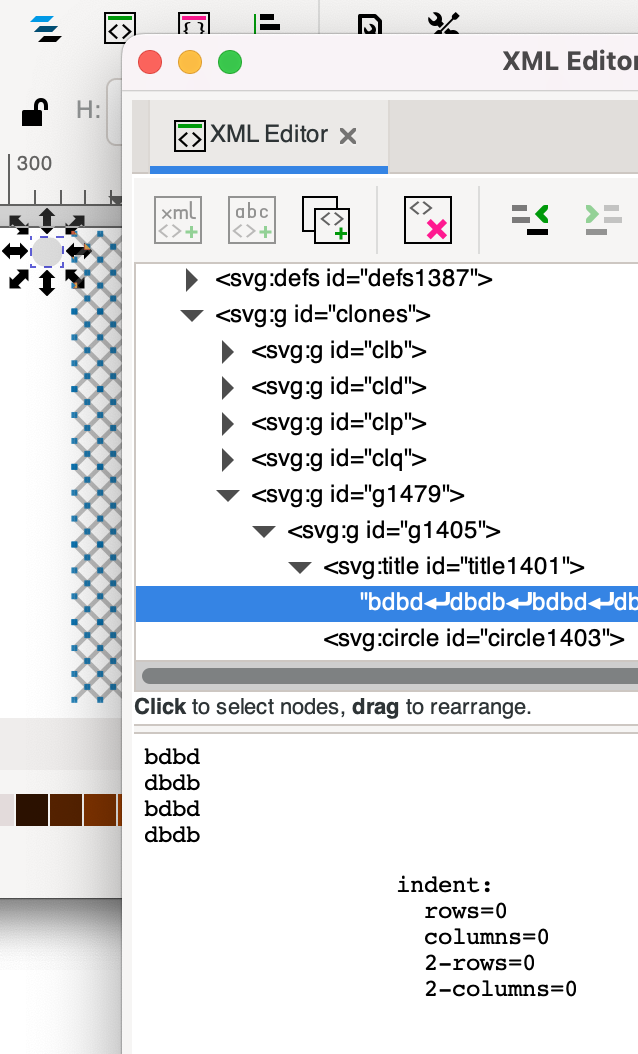
Hover with your mouse over the grey dot next to a swatch for a tooltip that shows the specifications. This can be of help after reloading a file. In Inkscape, you need the XML-editor to retrieve the information. Other SVG editors might or might not preserve this information.
Interact with template
Constraints
Some constraints are enforced:
- Stitches along the perimeters can not move or be deleted
- New stitches can only be made between two neighbouring kissing pairs.
- Stitches along opposite borders are identical.
You have to observe the following constraints by yourself:
- Keep the position of stitches within the perimeter of the template.
- Only create stitches with the bright sections of kissing pairs
- Don’t separate the template in two disconnected sections, though some swatches may produce valid results.
- Stitches along the perimeter should be symmetrical when reflected in a vertical or horizontal mirror.
- Stitches should be identical for all borders for the template variant with stitches in the corners.
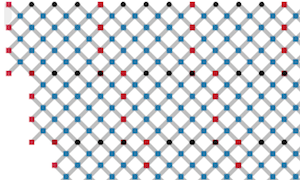
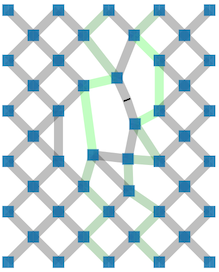
The following diagram illustrates one of the reasons for the requirements along the edges of the template. The stitches are projected on top of one another and the line with black stitches is interrupted with red ones.
Click/Tap
Clicking a line segment between two stitches sets the number of twist marks. Clicking a stich either deletes the stitch or changes its color code, depending on the choice made in the form modify template.
Deleting stitches may cause segments on top of one another, they appear darker. When reconnecting, move a bright segment to the darker ones for predictable behavior.
The legend not only enumerates stitches in the template, but also reflected and rotated versions.
Note that the tooltips in the swatches show the original ct sequence, not the reflected or rotated versions.
Drag Stitches
Moving stitches is pretty trivial but is subject to some constraints.
Add stitches
Moving the center of a line between two stitches initiates a kind of pinching action to create a new stitch.
To fix mistakes, it is good to have click mode for stitches set to delete before you start dragging. To undo, simply click at the same spot where you released the mouse button.
On mouse down you will see two highlighted pairs kissing the selected pair. Move the mouse to the center of one of the bright segments to make a new stitch and release the mouse button.
Third party editors
After download, you can customize and annotate the generated patterns with a third party editor. The generated files have properties to observe when customizing and reloading for further changes with the web page.
A not exhaustive list of third party products and services:
- Lace8 and Knipling (💰, not on Mac) don’t understand the downloads at all.
- Inkscape (free, open source) keeps the clones.
- offidocs includes Inkscape for iPad and chrome/Firefox plugin (subscription to get rid of adds).
- Affinity Designer (💰, iPad; also for Mac and Windows) unlinks the clones by default.
- CorelDRAW (💰💰, subscription; Home and Student Suite 💰, Windows and Mac) unlinks the clones by default. No intention (2018) to implement an import option that treats clones as such.
- Adobe Illustrator (💰💰, subscription)
File structure
The code snippet below is a trimmed down version of a generated file to illustrate its structure.
The SVG document is loaded into an HTML element <div id="template">.
The template diagram as discussed above lives actually in the group with id #cloned.
This identifier reflects how the group is used to create the swatches in the group with id #clones.
<defs>
  <marker id="twist-1"/>
  <marker id="twist-2"/>
  <marker id="twist-3"/>
</defs>
<g id="clones">
  <g id="clb"><use xlink:href="#cloned"/></g>
  <g id="cld"><use xlink:href="#cloned"/></g>
  <g id="clp"><use xlink:href="#cloned"/></g>
  <g id="clq"><use xlink:href="#cloned"/></g>
  <g>
    <g><title/><circle/></g>
    <use xlink:href="#clb"/>
    <use xlink:href="#cld"/>
    <use xlink:href="#clp"/>
    <use xlink:href="#clq"/>
    ...
  </g>
  ...
</g>
<g id="bdpqLegend"/>
<g id="cloned">
  <path class="link kiss_2 starts_at_123 ends_at_456"/>
  ...
  <g id="123" class="node"><title>ctc<title>...</g>
  ...
</g>
A change to a field in the form section swatches of templates replaces the full content of #clones.
A change to a stich in the template replaces the full content of #bdpqLegend
and one of the elements with class node.
Due to their nature the appearance of the <use> elements change along with template in group #cloned.
The algorithm to delete and add stitches relies on the classes
in the elements of #cloned and the ids of the node elements.
The classes node, link and kiss_ allow selecting and manipulating groups of objects.
The classes starts_at_ and ends_at_ allow moving segments along with the stitches.
They should also allow to build a chain of links within a kissing pair.
Note after unlinking clones, the classes starts_at_, ends_at_ and kiss_
lose their functional meaning, like the title in the node groups.
Unlink clones
Inkscape may react slow unlike other applications that import clones as plain copies. To improve the performance in InkScape, you might want to remove the patterns you are not interested in.
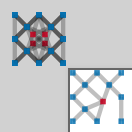
A drastic way to unlink is removing the originals: the template in the top left corner of the sheet and four b-d-p-q clones stacked on top of one anther beyond that corner of the sheet. That action might take a wile, and you loose the power of changing all copies at once.
Other changes
To increase swatch sizes, repeat the last 4 rows and/or columns of template copies. Snapping is a great tool to align the groups of objects: